Showing posts with label auto painting. Show all posts

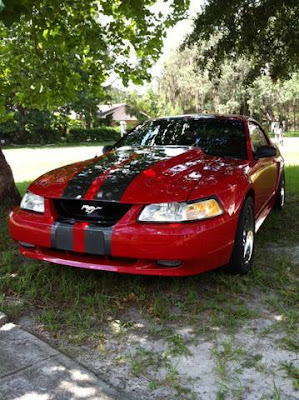
Total 2000 Mustang GT Make-Over....A Father & Son Make Perfect Team!

Posted by Unknown

Baseball, hot dogs, apple pie, and Chevrolet....or, in this case, Ford!  Either way, what could make a better story for the 4th of July than a great father and son Mustang make-over!


We do all kinds of custom work here at LDJ Auto Body.  From the installation of accessories to full blown custom modified projects.  One thing we love seeing here, though, is family members working together. And car projects are just custom made for that!  It's fun and, most of all, it's rewarding!

This 4th of July, I want to show you a great father - son project car that came to us for a carbon fiber hood installation and complete paint job.  This 2000 Mustang GT is Eric's first car and he and his dad, Howard, have spent countless hours working together on this project.  They have done some awesome things to the car and I think you'll agree, all their "sweat equity" was well worth the time and effort.

The car came to us as an original 2000 Mustang GT in great condition.  A few minor dings and some parking lot damage was the only "body work" necessary.

The make-over consisted of fitting and installing a cowl inducted, carbon fiber hood and a complete paint job including a painted "Lemans" stripe package.  A great combination for this car. 

The car was scuffed and prepped for paint and some the minor body work taken care of.  DuPont was the product of choice and DuPont supplied everything from the filler to the paint and clear coat.  We work almost exclusively with DuPont here at LDJ and find their products work great for us and our customers in terms of durability and cost.

After repairing the minor body damage, the new carbon fiber hood was installed and fitted.  The hood really made a difference in the look of this car.  Adding a rounded effect to the entire front end and also adding 3 1/2 inches to the overall height of the hood.  The cowl inducted hood changed the entire look and definitely brought out the "muscle car" look in this Mustang.


After completing the prep work, the car made it to the paint booth where Larry Blackman, owner of LDJ Auto Body, works his magic.  Larry has been doing custom paint work for almost 40 years and his expertise shows in all of his work.  You can see more of his work at our website, www.ldjautobody.com.

The vermilion red base coat with a light metal flake and very light pearl really brightened up the look of the car.  The Lemans stripe is done in a "gun-metal blue-gray pearl" which brought out the blue in the metal flake and just looked fantastic.  The stripe package really put the finishing touches on this awesome looking 2000 Mustang GT! 

This full make-over also included a vast amount of engine and suspension work that was done by Howard and Eric themselves.  I wish you could hear it run!  This cars sounds great and runs even better.  I asked them to give me a list of what they had done and I'll let Howard tell you in his own words what modifications were done to the car, "We started with brakes and suspension. We replaced the brakes, shocks, struts, ball joints, and lowering springs.  We also installed 4.10 gears and a cold air intake and installed Comp 270 cams, long-tube headers, and catless X-pipe.  Inside we installed racing seats and a short throw shifter and finally we purchased a 3 1/2 inch cowl hood. Then we started searching for a painter and decided to go with LDJ Auto Body and Mechanical.  We're very happy with the outcome of the paint and the hood installation! 

Howard and Eric did an outstanding job on the motor and suspension work.  Here's a shot of "under the hood"!   You can see the time spent under her hood is significant and the car runs great.  Awesome job guys!

All in all the car looks and runs fantastic.  The addition of the cowl inducted hood really put the finishing touches on the overall look of the car.

LDJ Auto Body & Mechanical is located in Gibsonton, FL, just off of I-75 and Gibsonton Dr.  If you would like further information regarding custom paint or custom modification work for your project, please feel free to give us a call at (813) 644-4497.  You can send pictures of your project for a free estimate to estimates@ldjautobody.com.  Don't forget to stop by our facebook page at www.facebook.com/ldjautobody and "like" our page! 


We love happy endings!  A big "thank you" to Howard and Eric McCorkle for bringing us this great 2000 Mustang GT for a make-over.  We wish you all the best and hope you enjoy this great car.

Happy Motoring to all our readers!

Larry and Dee Blackman
LDJ Auto Body & Mechanical
Gibsonton, FL 
(813) 644-4497

SQKZJM3MC2N3

More about → Total 2000 Mustang GT Make-Over....A Father & Son Make Perfect Team!

2000 Mustang GT - A Father & Son Project by LDJ Auto Body & Mechanical, Gibsonton, FL

Posted by Unknown

2000 Mustang GT Project Car!
A Father and Son Colaboration
by Howard and Eric McCorkle! Great Job Guys!


Cars are something that all of us deal with daily.  But, our first car....well, now, that is something special!  We all remember that special day when we got our driver's license.  That day is, if you think about it, the first real step into the future.  The day when we experience real freedom. It's a special feeling to push that key into the ignition knowing that we are truly "on our own". 

The next step to "emancipation" from parental control is the day we get our first car.... And our first car is something that stays with us for the rest of our lives.  I'll bet there isn't a single one of us that doesn't remember the day we bought it!  I can even remember how it smelled!  Seriously....our first car is something special.  It is a special feeling that we just never forget. 

That's why this story is special to me.  I love seeing a father and son team up and work together on that special vehicle.  It's something I have been lucky enough to share with many "father and son" teams and each and every one of them makes me smile.

Our latest project car was just that.  We got an email from Howard, Eric's dad, asking how much it would cost to "just paint the car and install a carbon fiber hood".  There's "no body work" the email went on to say, "but, my son would like a nice paint job, and we're thinking about a Lemans stripe package".  "He is paying for the work himself and I have heard that you guys do some really great work there." "I'd like to see him get a nice job." "Please get back to me. Thanks. Howard".  As I read the email, a smile crept over my face as I thought about all the "first cars" we had painted here at LDJ.

I remembered my youngest daughter's first car, a Mitsubishi Eclipse that Larry had literally "cut in half"!  Yep, she wanted that car more than anything in the world, and, at that time, the only way we could afford a DOHC, fully turbo charged, gleaming black Eclipse was if we "fixed one up" and the only one we could find to fix up was basically "a total loss" in the rear end!  So, Larry and I bought another one and he cut the damn car in half and welded the two halves together!  Walah!  One gleaming black, DOHC fully turbo charged Mitsubishi Eclipse commin up! Yes, having one of the best body men on the planet for a dad has it's advantages!

As I answered Howard's email, I already knew that we'd be taking on this job.  My husband Larry is a great bodyman.  But, first and foremost, he is a dad and a husband.  And, I also knew that Howard had come to the right place to get his son's car painted and modified.  As Larry looked at the pictures of the car, I could see the smile....the same smile I see every time we paint a "first car".  It is just something that he loves to do....and, he loves seeing the look on the face of that "first car owner" when they see the car for the first time after it's done.

This is an awesome representation of what a great
father & son team can do when they put their heads
together!  This beats all the video games and time lost
with our kids due to "texting" and "facebooking"!
This car was special though.  We both love Mustangs and Howard and Eric had already been very busy doing what guys do to "first cars"!  When I was asking Howard for his permission to share this car with all of you, I also asked him what he and his son, Eric, had done to the engine and the rest of the car....it was obvious that they had been working hard on turning this first car into something very unique!  In his own words..." We started with brakes and suspension.  We replaced the brakes, shocks, struts, ball joints, and lowering springs. Installed 4.10 gears and a cold air intake. Installed Comp 270 cams, long-tube headers, and catless X-pipe. Intalled racing seats and short throw shifter. We purchased a 3 1/2 inch cowl hood. Then we started searching for a painter and decided to go with LDJ Auto Body and Mechanical. Very happy with the outcome of the paint and the hood installation!  And believe me, they did an outstanding job!  Here's a shot of "under the hood"!  I wish I had recorded the sound of this car....it's awesome!  You can see the time spent under her hood is significant and the car runs great.

The car was in great condition for it's age to begin with.  A few minor scratches were the only "body work" that needed to be done.  We started by removing the finish on the vehicle.

The car was fitted with a new, fiber carbon, 3 1/2 cowl inducted hood.  After fitting and prepping the hood.  The painting process began.

From primer to base coat, the car progressed nicely.  The Lemans stripe package really impressed me.  The color of the stripe is a pearl, gun metal blue-gray that really set off the red in the car's primary color scheme.


The paint job was completed using all DuPont products.  From the filler for the 3 very minor scratches to the base coat / clear coat finish, DuPont supplied every stitch of the material.  Even the outrageous "gun metal blue to silver" flip / flop pearl Lemans stripe was DuPont. 


The finished product is spectacular and the color combinations are fabulous.

The 2005 Mustang GT has some fantastic body lines and screams "muscle car" with styling that brings back the original "pony" car itself. 

Ford's attempt at re-creating the original look of the early Mustangs was a huge success and the Mustang, new or old, has become one of the most popular cars on the road today.

We hope Eric enjoys this outstanding "first car" as much as we enjoyed helping him get this project finished! 

We'd like to thank Howard and Eric for letting us share this great vehicle with our readers and we wish them all the best.


For more information on restoration and custom paint work, give us a call at (813) 644-4497.  Larry Blackman is always available to answer your questions and help you find the best solutions to getting your project up and running at prices that will fit your budget. 

We also do motorcycle restoration and custom bike work. 

Estimates are always free so call us today to see how little it can cost to get your dream car or bike on the road today!

Happy Motoring!

Larry and Dee Blackman
LDJ Auto Body and Custom Shop
Gibsonton, FL
www.ldjautobody.com
lblackman@ldjautobody.com


More about → 2000 Mustang GT - A Father & Son Project by LDJ Auto Body & Mechanical, Gibsonton, FL

Prepping For A Show Quality Finish - How The Pros Do It

Posted by Unknown


Ahhh, the satisfaction of the "do-it-yourself" project.  It's a great feeling to finish a big project and see the return on your "sweat equity" investment!  Working on a classic or custom vehicle project that you've done yourself certainly ranks high on the list of "do-it-yourself" accomplishments.  While going thru my list of blogs that I follow, I came across a great article for the "do-it-yourself" car enthusiast that was really well done.  It's definitely an 8 or better on the rating scale for covering some great information and so I'd like to share it with you here.  It's a great place to start for anyone wanting to take on the job of putting an excellent paint job on your custom or classic project.

1970 Convertible GTO from blog post at AutoMedia.com
The folks at Automedia.com have put together and article entitled "Paint Secrets" that is one of the best I've seen in awhile.  It is in-depth enough to get you headed in the right direction when getting ready to do a quality paint job.  The article is written by Jim McGowan of Automedia.com and he has done a superb job in our opinion.  Jim's advice here is excellent and following the instruction he has put together will definitely head you in the right direction for a beautiful finished product and as you can see from the final picture, this GTO looks great.


Jim touched base on a very important point when he said to check with your shop to find out what type or brand of paint system they are planning to use when spraying the final finish.  We can't stress this enough.  Paint systems are all different and they don't mix well!  Always stay with the same manufacturer throughout the project AND if you have any questions regarding which products to use durring the prep work, ask those questions before you start.  There is no shame in not understanding what products to use. There is a seemingly endless list of products available for different uses and even products by the same manufacturer can cause problems depending on what system you are using.  It's always better to clarify those questions prior to using any product in the paint prepping stages as an error here will not only require extra work, but, can be extremely costly depending on what needs to be done to correct the error.  Ask first and be happy later!

Meguiar's Premium Car Care Products & Accessories

If you are going to be spraying the primer yourself, there are a few suggestions I might add to make the difference between a good and a great paint job.  If the vehicle has had a significant amount of body work done, using a high build primer will give you the advantage of making sure those little spots don't blemish the final finish.  High build primers are thicker and will help first timers get a little better coverage on hard to see and feel low spots.  It's a little harder to sand, but, also more forgiving to the amateur when sanding and blocking the primer.  The primer is final finish before the color and how you prep that will determine what your final finish is going to look like.  The better the primer finish, the better the paint job. 

Scan down the sides of the vehicle.
Look for any highs or lows.
Looking down the sides of the vehicle is key at this point.  Use different lighting to ensure that there are no ripples, high spots or low spots.  Check the body lines for any indentations that occurred during sanding.  Feel the finish using the "flat" of your fingers and palm of your hand.  Close your eyes and follow the finish with your hand.  If you can "feel" it, you'll definitely be able to "see" it and now is the time to "fix" it!

When it's time to apply the color, the first thing to do is to "wash" the finish with a high quality wax and grease remover.  Don't skimp on quality here.  We recommend Prep Solvent-70 by 3M, but, any good prep solvent will work.  Use two rags when performing this process.  Wet the first rag with the solvent and wipe it onto the surface and then immediately use the second, dry rag, to wipe it off.  Do NOT allow the solvent to air dry on the surface.  This defeats the purpose and allows the grease and grime to stay where it was.  This process is key to a good final finish in that it removes any substances that might cause blemishes or "fish-eye" in the final product.  Do this process in small areas and ensure that you don't miss any areas.  Don't forget to get into the small groves and areas that aren't as easy to get at as those areas are the very ones that will allow moisture and corrosion later on and give those things a starting place.  Use this process to inspect the entire car for any items that need to be fixed, like edges where the primer might have been broken through.  This is the perfect time to do your final inspection as you do have to go over the entire vehicle.  Also, do this step right before you are ready to apply the paint.  Don't wait for a long period after as airborne chemicals will have time to settle on the finish if you don't do it right away.

When you are satisfied that you're ready to go ahead with the color, follow the instructions exactly as the manufacturer recommends.  Measure twice, mix once is the attitude to have here! 

I concur with the writer that the initial color coat should be kept just slightly lighter.  This coat should be used to find any problems that are going to arise.  Look for any anomalies in the finish.  Sanding this coat with 1500 will assure good adhesion of the following coat and give you the ability to look for any problems while you're sanding.  Make sure to go over the entire vehice with a "tac rag" to remove any traces of dust or debris from the sanding. Once the finish has been sanded, you're ready to lay the final coats of your color.

Jim's description of the spraying motion is very important here.  Lay the paint evenly using your wrist with a snapping motion to avoid "lingering" in any spots.  Slow and steady wins the race here.  Start from the center of the hood, deck lid, and roof panels and work toward the edges. Watch the paint as it hits the surface and ensure that it is wet, but, not heavy enough to run.  This is an art that you will perfect as you go and looking at the surface as you paint is the best indicator.  Gravity fed guns do not require a lot of pressure, but, you must atomize the paint to ensure good adhesion and keep the solids, like metal flake or pearl from concentrating in one spot.  Check for even color in between coats.  Mentally make a note of anything you need to give attention to on the next coat. 

When spraying base coat / clear coat systems, remember that the clear is going to protect the finish for a long time.  This is not the place to save money.  The clear is going to be the layer that is brought to a mirror-like gloss in the final process of your finish, but, some of it is going to be removed in that process!  On "high-end" show cars, I have sprayed as many as 5 to 6 coats of clear, or more, and sanded them in-between.  Depending on what you want the finished product to look like, I recommend at least 3-4 coats of clear on any show quality finish.

Lastly, I also concur with Jim McGowan on his last statement that "rubbing out" or buffing of the completed finish is best left to the pros until you have gained a good confidence in your abilities.  On show paint, I wet-sand the entire vehilce "by hand" allowing me to see any imperfections that need attention.  Tiny bugs, dust, or any other anomalies should be wet-sanded out.  After wet-sanding the entire car, start the buffing process using a high quality machine buffing compound.  Buffing compound is extremely abrasive.  Be careful even when wiping the excess off with a rag as the compound will leave scratches where you wipe it!  Keeping the buffing bonnet perfectly flat on the surface is the key here.  Keep the bonnet clean!  Remove any excess compound by running a screw driver or other sharp object against the bonnet as it spins.  Watch for "caking" of the compound on the bonnet.  I prefer a "foam" bonnet over the "wool".  Wool was fine in the old days when foam wasn't available, however, it's much harder to burn the finish with foam than with wool, so it's a good idea to use foam, especially if you're just learning.  I also prefer foam because it is a lot more flexible and offers better action on edges and "hard to get to" places. 


Shop Meguiar's - Quality Care Care Products

 After buffing the entire vehicle, the next step is to apply machine glaze.  Machine glazing removes any swirls from the compound and brings out the "mirror-ike" finish in the clear.  Once again, glaze is also an abrasive, so be careful when removing any glaze after you're done as it will scratch the beautiful finish you've worked so hard to achieve. 


Take care in choosing the proper products to perform the final steps in buffing and protecting your finish.  Meguir's is a leader in automotive finish care products and their products are formulated to give you the very best in finish care.  You can find all the products you need at our "Onine Finish Care Store".  The products listed here are the ones we recommend and the links here will get you the best prices as they are direct from Meguir's! 

Check Out What's HOT at MeguiarsDirect.com!When the finish is complete, I like to give it a machine wax followed by hand rubbed wax for the final finish.  Hand rubbing the final wax coat gives you a good basis for getting all the residual compounds out of the small crevises and corners and leaves a thicker coat of wax to protect that finish. 
1970 Cutlass 442 Convertible painted by Larry Blackman
Notice the mirror like finish down the sides of a completely straight quarter.
Viewing the vehicle from this angle shows all imperfections.
See more paint work by Larry at www.ldjautobody.com


OK, now, stand back and observe the beautiful, new finish on your vehicle! 

Happy Motoring!

Larry and Dee


More about → Prepping For A Show Quality Finish - How The Pros Do It

1966 Impala Super Sport Restoration Project Update!

Posted by Unknown

As promised, here is the update on the 1966 Impala Super Sport restoration.  The car is comming along beautifully.  With only a couple of minor setbacks, we should be right on track with her finish date of February 14th.

As you can see in the updated photos, the removal of the existing paint is coming along nicely.  The acrylic enamel that was on the vehicle is a thick, tough, single stage paint and the sanding takes a little longer than usual.  However, the body work that was previously done on the car was exceptional and she is still very straight in her lines. 
As shown in the pictures to the right, the car did need some welded patches which have been taken care of.   The first patch was the one shown here in the top of the drivers side fender.  Some small holes just below the window line required a small metal patch which has been finished in this photo. 
The next problem area was the drivers side quarter panel, which also required a couple of small metal patches to fill in the area along the extreme lower rear area of the quarter.  An area notoriously noted for this type of problem in a car of this age.
The next two problems to be addresed in this vehicle will be the nose and the gutters in the trunk area which collect any water that seeps through the deck lid. The pictures below show these two problem areas. 

The trunk gutters will most likely be removed from another vehicle or replaced with an aftermarket trunk lining.  In either case, they will be welded in after removing the rotted metal of the existing gutters.  Although this problem looks worse than it really is, most vehicles of this age are stricken with this problem simply because of the purpose of the gutters themselves!  We all know that water and metal make rust and this type of damage is common.
The nose of the vehicle had previously been repaired and you can see that the previous damage was extensive.  This piece will be replaced with original equipement taken from another vehicle.
The final portion of this vehicle we want to point out in this update is the work done on the door jams.  In these final photos, you can see the doors were removed to repair the damage in the jam area.  We can't stress enough the care you need to take in this area of the vehicle.  The cars of this era have extremely heavy doors.  For this reason, the door jam areas and hinges must be extensively inspected for any weak areas and any rusted metal removed completely and metal patches be welded in place.  The following photos show the doors removed and the repair work done to the jam and hinge areas.

We'll be posting the next update next Monday, so be sure to check back to see the progress in our next report.  Remember, our technicians are always here to answer any questions you may have on your own project.  You can reach us at (813) 644-4497 from 8:00 am to 4:30 pm Eastern Time, Monday thru Friday.

Register now for our newest "do-it-yourself" body repair articles comming in February!  Great articles written by our technicians for those of you who do your own project work!  Our techs describe the repairs in detail and give a list of materials necessary for the repairs.  A must have for the do-it-yourself library!

Till next time,

Dee Blackman
LDJ Auto Body and Custom Shop

More about → 1966 Impala Super Sport Restoration Project Update!

Our Other Great Sites for Cars, Trucks, and Motorcycles! News, Parts, Pics and More!

Posted by Unknown

Don't forget to check out our other great websites too! 

Get some great tips and pointers about all things automotive, including cars, trucks, suvs and motorcycles in our newsletter, LDJ Auto Body's Car, Truck and Motorcycle News.   Check out the latest, greatest automotive and motorcycle accessories at places like Andy's Auto Sport, Auto Parts Warehouse, Cruiser Customizing, Auto Anything, J.C. Whitney, and Auto Sport Catalog.

Our affiliates are offering the best prices on everything for your car, truck, suv or motorcycle. Our newsletter will give you links to some great deals from these suppliers.  Check back often for new deals and great savings like free shipping and unbelievable sale prices!  Sign up for our newsletter and make sure you don't miss out on any of the great savings! 

Don't forget, here at LDJ, we'll give you the absolute best prices on the installation of all your accessories.  We offer the lowest prices on full body kit installation, ground effects, spoilers and much more!  You can even have your accessories shipped directly to us and we'll call you when they come in to schedule your installation.  Our technicians can match any factory or custom paints so your body kits, ground effects and any other accessories will match flawlessly.  We can also mold in any accessory kits for a seamless finish! 

Your chrome motorcycle accessories will set your bike apart from the crowds and with our low installation costs and the great savings you'll get from our affiliates, you can increase the value of your bike without decreasing the value of your wallet!  We'll paint your hard sided bags and luggage carriers to flawlessly match any custom or factory color and install them for prices none of the dealers can match!

You can see the latest updated pics of our ongoing projects at LDJ Auto Body and Custom Shop!  See pictures of these restorations from start to finish along with explanations of how and what is being done to these fine cars. 

Remember, you can speak to our technicians at any time.  Our techs are always happy to help you with any questions you may have regarding your own projects.  Feel free to email us your pics for questions or a phone estimate of anything you might need!

Don't forget, LDJ Auto Body is a full service auto body repair and collision repair center.  From dents and dings to heavy collision and frame work, we'll give you the best deal on all your automotive repairs!

We look forward to hearing from you!

Larry and Dee Blackman
LDJ Auto Body and Custom Shop
Your "one stop shop" for everything automotive!


More about → Our Other Great Sites for Cars, Trucks, and Motorcycles! News, Parts, Pics and More!