As promised, here is the update on the 1966 Impala Super Sport restoration. The car is comming along beautifully. With only a couple of minor setbacks, we should be right on track with her finish date of February 14th.
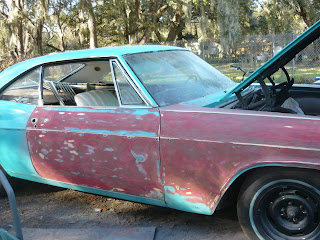 As you can see in the updated photos, the removal of the existing paint is coming along nicely. The acrylic enamel that was on the vehicle is a thick, tough, single stage paint and the sanding takes a little longer than usual. However, the body work that was previously done on the car was exceptional and she is still very straight in her lines.
 As shown in the pictures to the right, the car did need some welded patches which have been taken care of. The first patch was the one shown here in the top of the drivers side fender. Some small holes just below the window line required a small metal patch which has been finished in this photo.
 The next problem area was the drivers side quarter panel, which also required a couple of small metal patches to fill in the area along the extreme lower rear area of the quarter. An area notoriously noted for this type of problem in a car of this age.
 The trunk gutters will most likely be removed from another vehicle or replaced with an aftermarket trunk lining. In either case, they will be welded in after removing the rotted metal of the existing gutters. Although this problem looks worse than it really is, most vehicles of this age are stricken with this problem simply because of the purpose of the gutters themselves! We all know that water and metal make rust and this type of damage is common.
 The nose of the vehicle had previously been repaired and you can see that the previous damage was extensive. This piece will be replaced with original equipement taken from another vehicle.


More about → 1966 Impala Super Sport Restoration Project Update!
 As you can see in the updated photos, the removal of the existing paint is coming along nicely. The acrylic enamel that was on the vehicle is a thick, tough, single stage paint and the sanding takes a little longer than usual. However, the body work that was previously done on the car was exceptional and she is still very straight in her lines.
 As shown in the pictures to the right, the car did need some welded patches which have been taken care of. The first patch was the one shown here in the top of the drivers side fender. Some small holes just below the window line required a small metal patch which has been finished in this photo.
 The next problem area was the drivers side quarter panel, which also required a couple of small metal patches to fill in the area along the extreme lower rear area of the quarter. An area notoriously noted for this type of problem in a car of this age.
The next two problems to be addresed in this vehicle will be the nose and the gutters in the trunk area which collect any water that seeps through the deck lid. The pictures below show these two problem areas.
 The trunk gutters will most likely be removed from another vehicle or replaced with an aftermarket trunk lining. In either case, they will be welded in after removing the rotted metal of the existing gutters. Although this problem looks worse than it really is, most vehicles of this age are stricken with this problem simply because of the purpose of the gutters themselves! We all know that water and metal make rust and this type of damage is common.
 The nose of the vehicle had previously been repaired and you can see that the previous damage was extensive. This piece will be replaced with original equipement taken from another vehicle.
The final portion of this vehicle we want to point out in this update is the work done on the door jams. In these final photos, you can see the doors were removed to repair the damage in the jam area. We can't stress enough the care you need to take in this area of the vehicle. The cars of this era have extremely heavy doors. For this reason, the door jam areas and hinges must be extensively inspected for any weak areas and any rusted metal removed completely and metal patches be welded in place. The following photos show the doors removed and the repair work done to the jam and hinge areas.


We'll be posting the next update next Monday, so be sure to check back to see the progress in our next report. Remember, our technicians are always here to answer any questions you may have on your own project. You can reach us at (813) 644-4497 from 8:00 am to 4:30 pm Eastern Time, Monday thru Friday.
Register now for our newest "do-it-yourself" body repair articles comming in February! Great articles written by our technicians for those of you who do your own project work! Our techs describe the repairs in detail and give a list of materials necessary for the repairs. A must have for the do-it-yourself library!
Till next time,
Dee Blackman
LDJ Auto Body and Custom Shop


